![New Founders Software-White.png]](https://help.intelligentbits.com/hs-fs/hubfs/New%20Founders%20Software-White.png?height=50&name=New%20Founders%20Software-White.png)
Navigate to the Operations tab, then select the Assignments icon.
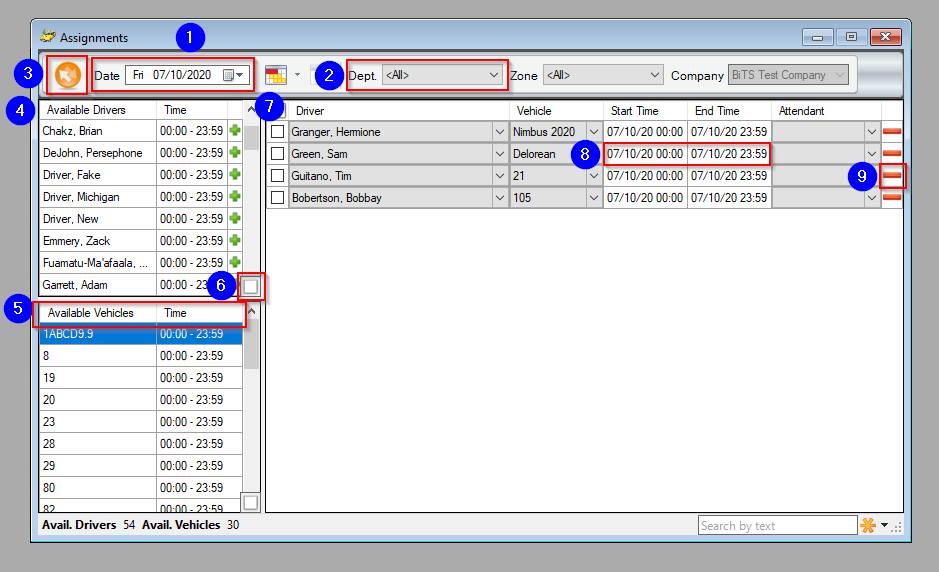
1. Select the Date you would like to create/review assignments for. This defaults to today's date.
2. The Dept drop-down allows you to filter drivers based on their assigned Department.
3. Refresh to review any changes that are made.
4. The Available Drivers are listed here, along with their available Time.
5. Available Vehicles and their available Time are listed below the available drivers.
6. These boxes can be checked if you'd like to hide any partially assigned drivers or vehicles. For example, a driver is already assigned on that date from 06:00-12:00. If this box is checked, they will not show up in the Available Drivers grid.
7. Currently assigned Drivers and Vehicles on this date will be displayed here.
8. The Start and End Times can be adjusted for each assignment. Any remaining time will display with that driver and vehicle in the corresponding Available Drivers/Vehicles grid.
9. To remove an assignment, click on the red line.
Related Articles:
How to Copy Assignments to Another Date
How to View What RoutingBox Mobile Version a Driver Has
How to Auto Assign Drivers to Routes
How to Switch a Vehicle
How to Assign Vehicles
Key Terms:
Assignments, AssignmentsFormHelp, Driver, Vehicle, Typical Vehicles, Assign Routes, Mobile Version, Odometer, Sign-Off, Department, Start Time, End Time