![New Founders Software-White.png]](https://help.intelligentbits.com/hs-fs/hubfs/New%20Founders%20Software-White.png?height=50&name=New%20Founders%20Software-White.png)
Navigate to the Operations tab, then select the Dispatch icon.
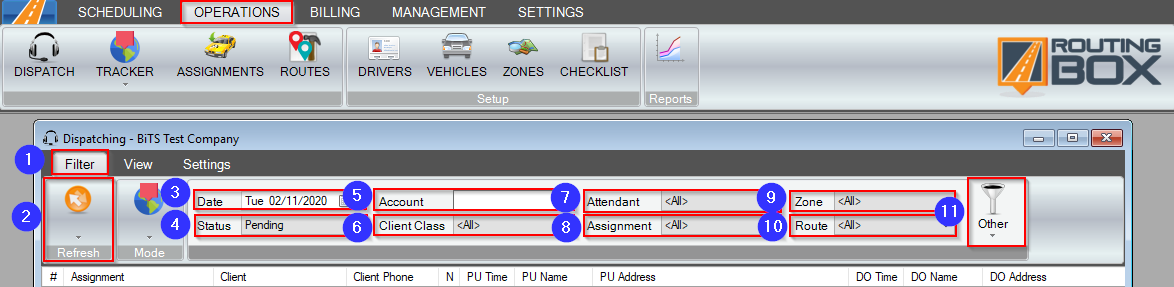
1. Go to the Filter tab.
2. Click Refresh to populate the grid with trip legs that fall within the parameters specified by your selected filters. The filter options are detailed in the steps below.
3. Date - Filter by the Date to change the date of the trip legs displayed in the grid. This function can be useful for pre-routing or reviewing trip legs from a previous date.
4. Status - Filter by the Status to display trip legs with a specific trip Status, such as Scheduled or Completed.
5. Account - Filter by the Account to display trip legs provided by a specific transportation broker.
6. Assignment - Filter by the Assignment to review trip legs with a specific driver and vehicle combination. To view trip legs that don't yet have a driver and vehicle assigned, select Unassigned from this drop-down.
7. Provider - Filter by the Provider to review trip legs with a specific Provider applied.
8. Routes - Filter by the Route to only view trip legs that are part of a particular Route. To view trip legs that are assigned to Any Route, select Any. To view trip legs that are not assigned to a Route, select None.
9. Mode - Filter by the Mode to display trip legs with a specific Mode of transportation, such as Livery or Ambulette.
10. Zone - Filter by the Zone to display trip legs that PU or DO in a specific Zone.
11. Click the Other filters icon to display more options.
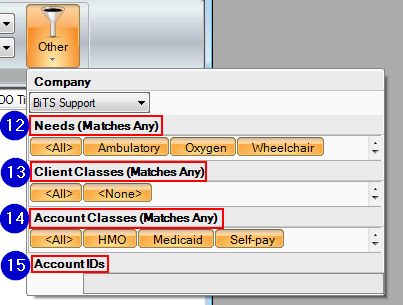
12. Needs - Filter by the Needs to display trip legs that have specific Needs applied. If a trip leg has any of the Needs that are highlighted in orange applied, the trip leg will be displayed in the grid.
13. Client Classes - Filter by the Client Classes to display trip legs that have specific Client Classes applied. If a trip leg has any of the Client Classes that are highlighted in orange applied, the trip leg will be displayed in the grid.
14. Account Classes - Filter by the Account Classes to display trip legs that have specific Account Classes applied. If a trip leg has any of the Account Classes that are highlighted in orange applied, the trip leg will be displayed in the grid.
15. Account IDs - Filter by the Account IDs by typing the ID numbers for the Accounts you would like to display in the grid. This filter allows you to display trip legs for multiple accounts in the grid at once.
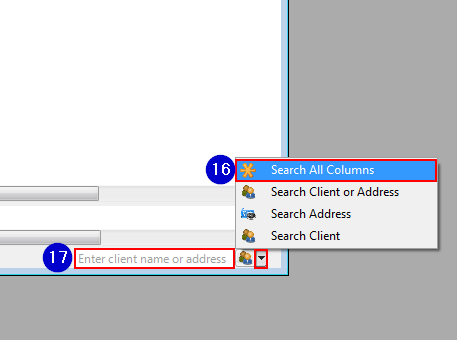
16. Use the Advanced Search menu to choose how you'd like to search for information. This will allow you to filter the information in the Dispatch screen down even further.
17. Enter the search criteria in this field. Any results that match the search will appear in the grid.
Key Terms: Filter, Dispatch, View, DispatchFormHelp