![New Founders Software-White.png]](https://help.intelligentbits.com/hs-fs/hubfs/New%20Founders%20Software-White.png?height=50&name=New%20Founders%20Software-White.png)
The Approval must first be entered on the client's profile under the Approvals tab in order to attach it to a trip. For more information click here: How to Enter Client Approvals.
Open the trip you wish to add the Approval to and follow the steps below.
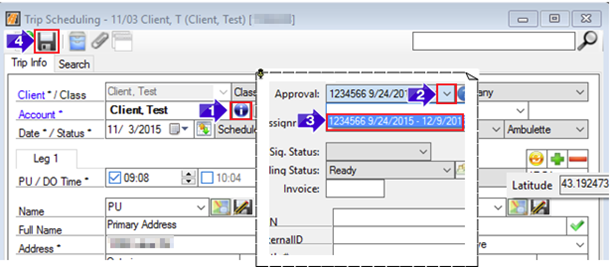
1. Click the Additional Information icon.
2. Click the downward facing arrow on the Approvals field.
3. Select the Approval to attach to the trip.
4. Save the trip.
Once an Approval is attached to a trip, it will deduct the respective trip's quantity of services from the total amount approved.
If there is not a sufficient quantity left on the Approval to cover the trip or the trip does not meet the restrictions setup on the Approval, you will not be able to attach the Approval to the trip.
Related articles:
How to Enter Client Approvals
How To Schedule a Trip
Key terms:
Approval, Approval Number, Scheduling trips, Authorization Number, TripSchedulingFormHelp