![New Founders Software-White.png]](https://help.intelligentbits.com/hs-fs/hubfs/New%20Founders%20Software-White.png?height=50&name=New%20Founders%20Software-White.png)
Navigate to the Settings tab, then select the Fields icon.
All required fields are identified with an asterisk*.
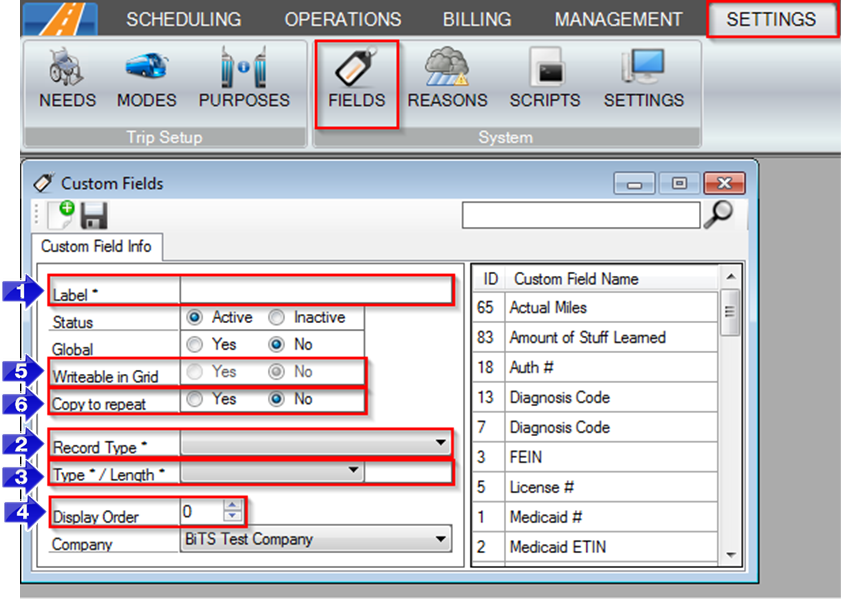
1. Enter a Label to name the Custom Field you are making.
2. Choose a Record Type to assign the Custom Field to a specific screen.
3. Choose the Type and Length of the Custom Field.
- Number– Allows numbers only, 0-9
- String– Allows a series of numbers and/or letters
- DateTime – Creates a field where a date and time can be selected
- DropDown – Allows you to create a drop down list of select-able items
4. If more than one Custom Field is on the same screen, the Display Order will dictate what order they appear in.
5. If the Record Type selected is Trip,then the Writable in Grid option will unlock.
- When this option is turned on, the Custom Field can be used from the Dispatching window and the Trip Scheduling window. This can be useful when making additional Notes fields.
6. If Copy to repeat is selected, the information entered in a Custom Field will copy over to the remaining trips in a repeat.
Key Terms: Setting, Fields, Customizations, Custom Fields, New Field, String, Drop Downs, Record Types, Display Order, CustomFieldsFormHelp