![New Founders Software-White.png]](https://help.intelligentbits.com/hs-fs/hubfs/New%20Founders%20Software-White.png?height=50&name=New%20Founders%20Software-White.png)
Navigate to the Operations tab, then select the Drivers icon.
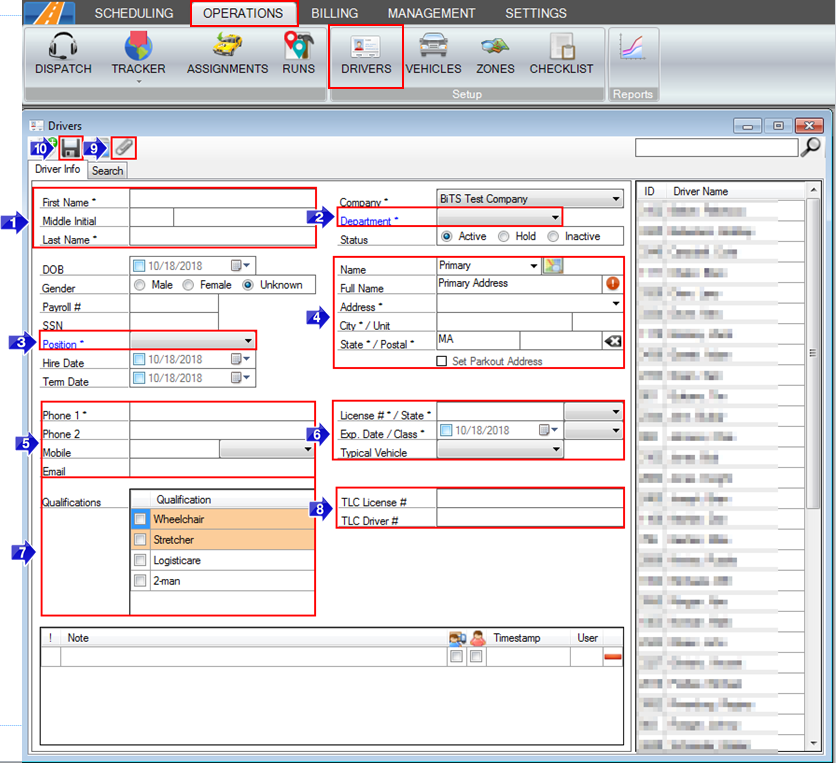
1. First and Last Name are required to create a Driver Profile.
2. Select driver from the Department drop-down.
3. Select driver from the Position drop-down. Other optional HR fields are available, such as: DOB, Gender, Payroll #, SSN, Hire Date, and Term Date.
4. Enter the driver's Primary Address. If the Primary Address is different than the location where the driver starts their day, click the check box to Set Parkout Address.
5. Enter the drivers contact information. Phone 1 is a required field. Phone 2, Mobile, and Email are optional fields.
Note: A mobile number and carrier are required to utilize the Paging feature. Please contact BiTS Support via live chat, email or phone if you need assistance to setup the Paging feature.
6. Enter the License # and select the State and Class from the drop-down. The Exp Date and Typical Vehicle are optional.
7. If requires training is set to yes on a Need Profile, it will show in the list of Qualifications. Checking the box next to the Qualification means the driver is qualified to transport clients with this need.
Note: A setting can be activated to prevent a driver from being assigned to trips they are not qualified for. Please contact BiTS Support via live chat, e-mail or phone if you're interested in having this setting activated.
8. This represents a custom field. If you would like to store any information that is not present, you can create a custom field.
9. You can use this icon to save any documents you wish.
10. Select the floppy disk to save the information.