![New Founders Software-White.png]](https://help.intelligentbits.com/hs-fs/hubfs/New%20Founders%20Software-White.png?height=50&name=New%20Founders%20Software-White.png)
Navigate to the Operations tab, then select the Zones icon.
Method 1 (Postal Codes)
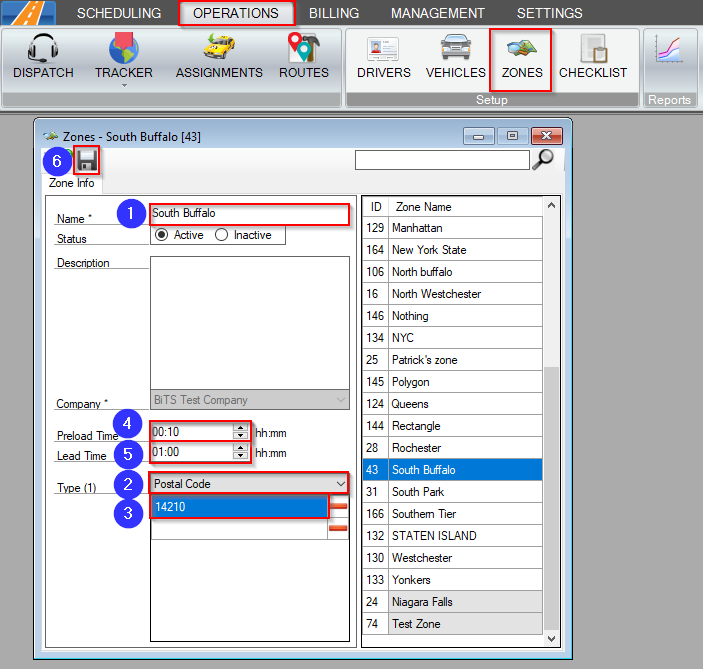
1. Enter a Name for the zone you're creating.
2. Select Postal Code from the Type drop-down.
3. Enter the Postal Codes that are within this zone. If you have multiple Postal Codes, you can simply enter each postal code, followed by a comma. RoutingBox will separate these as individual Postal Codes when you save your changes.
4. A Preload Time can be added for dispatchers to see when they should dispatch drivers to trips that are out of the normal service area. The Depart column in the Dispatch screen will be populated with the PU Time minus the Preload Time. For example, if a trip picks up at 15:00 and the Preload Time is 1:00, the Depart column in Dispatch will display 14:00.
5. If you have auto dispatching, the Lead Time indicates how much earlier than the PU Time you would like a trip dispatched. For example, if a trip picks up at 15:00 and the Lead Time is 3:00, the trip will be auto-dispatched at 12:00.
Note: Please contact BiTS Support via phone, live chat or e-mail if you're interested in auto dispatching.
6. Click the floppy disc icon to save your changes.
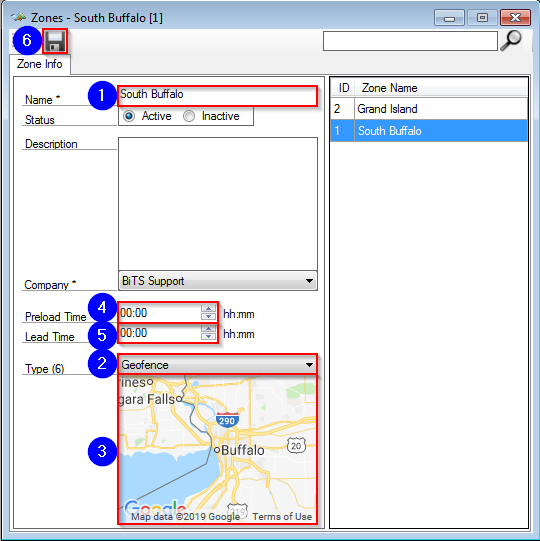
Method 2 (Geofence)
 Name
Name
1. Enter a Name for the zone you're creating.
2. Select Geofence from the Type drop-down.
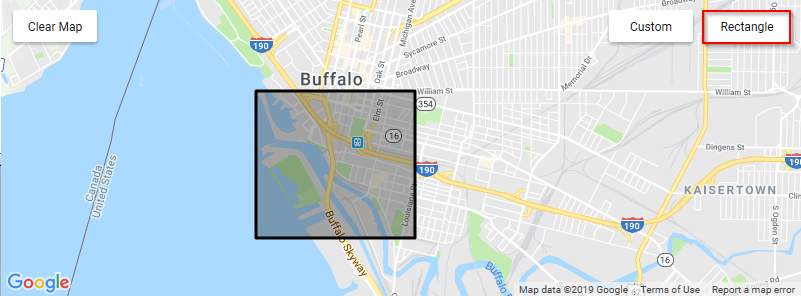
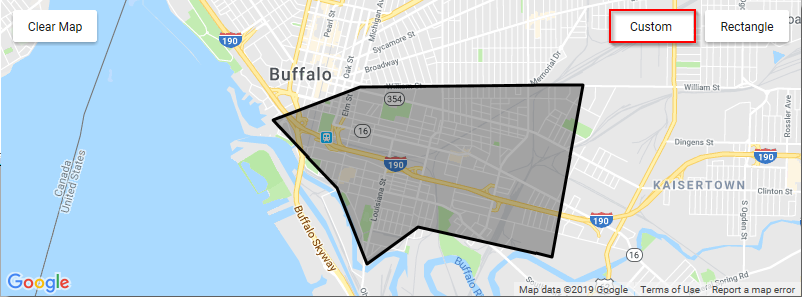
3. Click on the mini-map. This will open up a larger map with two options for creating your desired Geofence.
- The Rectangle option allows you to click and drag. When you unclick, a rectangle will be created around your desired zone.
- The Custom option allows you to click on the map, then move the mouse to another location and click to create the visualized line. This allows you to make a customized polygon using straight lines around your desired zone.
4. A Preload Time can be added for dispatchers to see when they should dispatch drivers to trips that are out of the normal service area. The Depart column in the Dispatch screen will be populated with the PU Time minus the Preload Time. For example, if a trip picks up at 15:00 and the Lead Time is 1:00, the Depart column in Dispatch will display 14:00.
5. If you have auto dispatching, the Lead Time indicates how much earlier than the PU Time you would like a trip dispatched. For example, if a trip picks up at 15:00 and the Lead Time is 3:00, the trip will be auto-dispatched at 12:00.
Note: Please contact BiTS Support via phone, live chat or e-mail if you're interested in auto dispatching.
6. Click the floppy disc to save your changes.