![New Founders Software-White.png]](https://help.intelligentbits.com/hs-fs/hubfs/New%20Founders%20Software-White.png?height=50&name=New%20Founders%20Software-White.png)
Navigate to the Scheduling tab, then select the Scheduling icon.
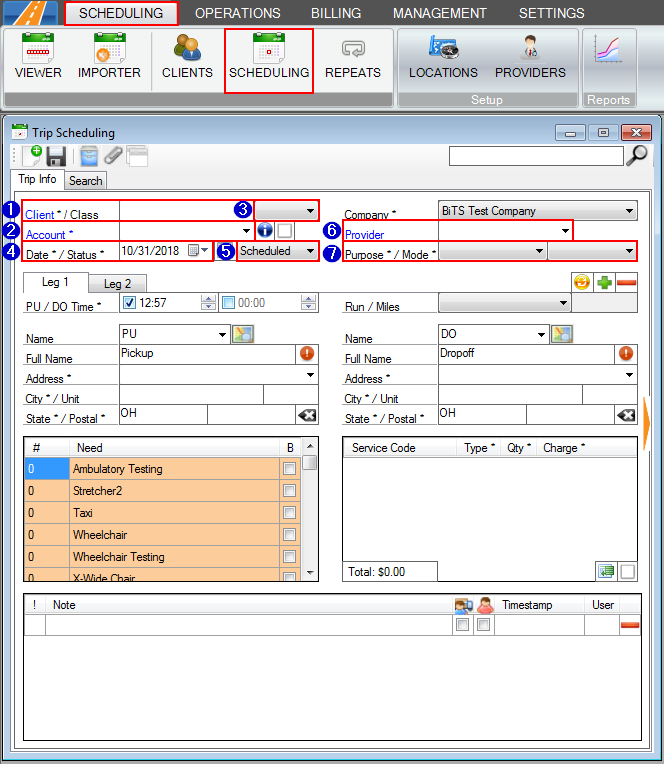
1. Select the Client the trip is for by searching for the first and/or last name. Once you select the Client, fields from the Client Profile will automatically be applied to the trip, including the Account, PU Address, and Needs.
2. Select the Account that will be responsible for payment of the trip. If there is only one Account saved to the Client Profile, it will populate automatically. If the desired Account is not an option, it must first be added on the Client Profile.
3. If applicable, select a Client Class from the drop-down. If there is a client class saved to the Client Profile, this will automatically populate.
4. Select the Date the trip will take place.
5. Choose whether this leg of the trip will be Scheduled (have a designated time) or WillCall (the client will call in when ready).
6. Provider can be selected if the trip requires an ordering provider ID for billing purposes.
7. Purpose and Mode specify the reason for the trip and type of vehicle that is required for transport. These will directly affect the codes and prices on the trip.
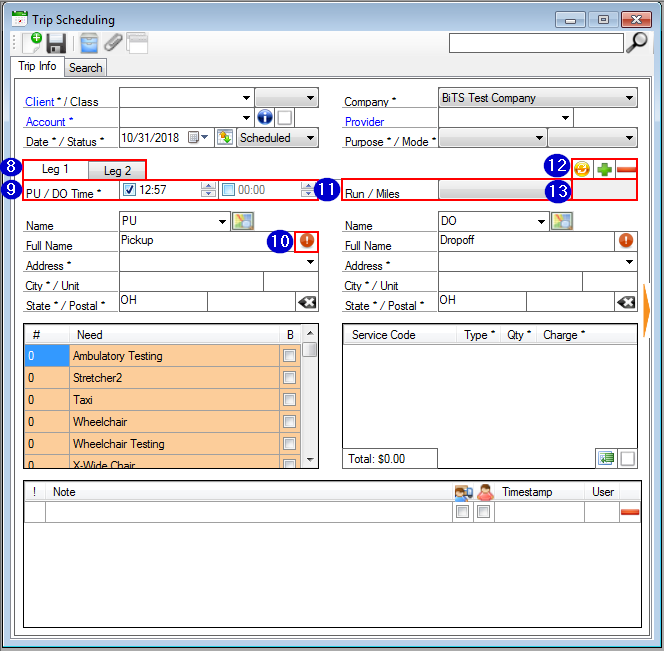
8. Everything on this portion of the Trip Scheduling window is unique to each leg. You can switch the leg you are viewing by clicking a different leg's tab.
9. If the trip is in a Scheduled status, enter a pickup (PU) or dropoff (DO) time for this leg. The other time will be calculated automatically once both addresses have been entered.
10. Enter the PU and DO addresses for the leg. The address will be mapped, and latitude and longitude coordinates will be applied. Once the address is geocoded, the red exclamation mark will change to a green check mark.
11. If the trip is part of a Route, select it from the drop-down.
12. Additional legs can be added or removed by using these icons. The green plus symbol will add a new leg, while the yellow circle will create a return leg. The return leg will have all of the same information from the first leg, but the PU and DO addresses will be reversed. If you wish to remove a leg, use the red minus symbol.
13. Once both addresses are entered, the mileage will be calculated and displayed here.
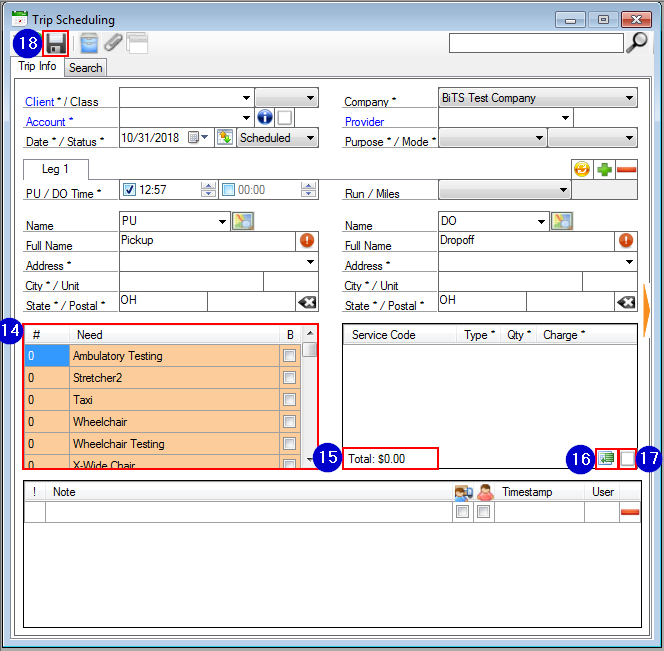
14. The Needs grid displays additional trip requirements that can affect codes and prices (i.e. Tolls, Oxygen, 2-man Assist, Surcharge). To add a Need, enter the number of units for the Need into the # column. If the trip requires the company bringing equipment (ie. wheelchair or oxygen tank), check the box in the B column.
15. The rates, calculated using the Trip Services setup for this Account, will display in the Service Code grid. The Total of these charges will be calculated in the lower left corner.
16. This button can be used to toggle between viewing the codes for one leg or all legs.
17. If any codes need to be adjusted on the trip, you can do this manually by clicking the override check box.
18. Once all the required information is entered, click the floppy disc icon to save your changes. This will now be visible in the Dispatch screen.
Video Link: