![New Founders Software-White.png]](https://help.intelligentbits.com/hs-fs/hubfs/New%20Founders%20Software-White.png?height=50&name=New%20Founders%20Software-White.png)
Navigate to the Billing tab, then select the Reports icon.
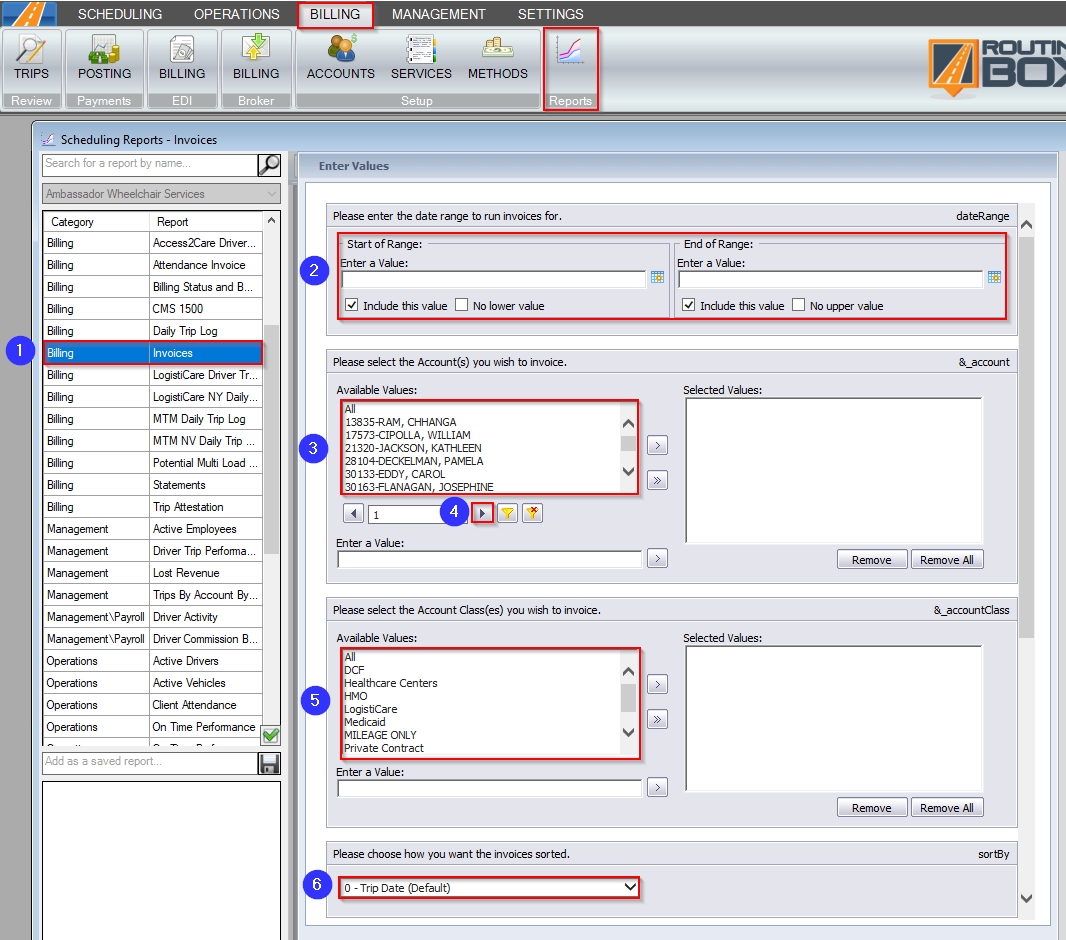
1. Double-click Invoices from the list of billing reports.
2. Click the calendar icons to select the start and end date for the trips you would like to invoice.
3. Double-click the Account(s) you would like to invoice.
4. If the Account isn't visible, use the drop-down to change the Accounts visible in the grid.
5. Double-click the Account Class(es) you would like included on the invoices.
6. Choose how you would like the invoices sorted.
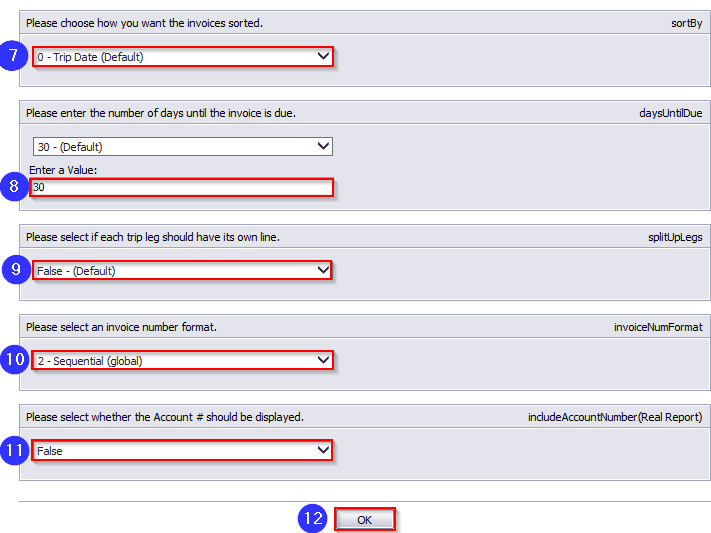
7. Select how you want the invoices sorted from the drop down.
8. Select the due date for the invoices from the drop-down or enter a custom due date in the field below.
9. Select whether each leg should have a separate line. By default, False is selected and legs will be grouped into 1 line per trip.
10. Select an invoice number format. Sequential-Parameter-Explained
11. Choose if you would like the Account # to be displayed on the invoice.
12. Click OK to create the invoices.

Note: Use the toolbar at the top of the report to print , export
 , or switch between pages
 .
.
1. The Invoice#, Invoice Date, and due date display here. If the Account # is selected, it will also be displayed here.
2. The client name, member number, pickup and dropoff location, type of service provided, and whether there was a no show, appear in the Description field.
3. This column shows the Quantity for each service provided.
4. This column shows the Rate for each type of service.
5. The total Amount is calculated by multiplying the Rate by the Quantity.
6. You can see any saved Location names before the dropoff or pickup location, as appropriate.
7. If an Approval is attached to the trip, the Auth# field will populate here.
8. The Total Due for this invoice is displayed here.
9. Please contact BiTS Support if you would like a custom message added to the bottom of your invoices.
Related Articles:
EDI Billing
How to Attach an Approval to a Trip
How to Enter A Client Approval
How to Make an Account Inactive
How to Search for an Inactive Client
How to Search for an Invoice Number
How to Use the Trip Viewer Quick Search
Key Terms:
Account, Account Class, Approval, Authorization, Billing, Client, Invoice, Member #, Provider, Purpose, Rate, Report, ReportingFormHelp