How to Set Up Trips in RoutingBox

Several screens in RoutingBox factor in how trips are organized and completed. Trip Setup should be completed before trips are scheduled in RoutingBox.

On the Settings tab, the screens for completing Trip Setup are on the left.

2021-10-18 08_29_28-Window

Needs are services that a client may require when being transported. For example wheelchairs, oxygen tank, or a monitor would be needs. Needs may also be used to specify additional charges on a trip, such as an after hours fee or weekend fee.

Modes of transportation represent the type of vehicle that will be required for a trip. Certain modes of transportation may have specific seating capacities.

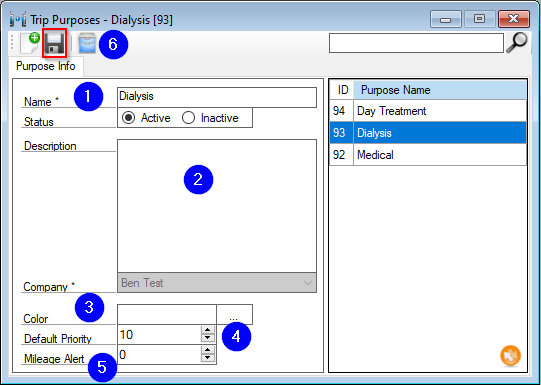
Purposes are used to indicate why a client requires transportation. These are the reasons for the trip.

Each trip scheduled in RoutingBox will require a Seating Need, a Mode, and a Purpose at minimum. Additional Needs may be added as necessary. Any combination of these elements may be used to arrive at a particular price. 

How to Create a Need

Navigate to the Settings tab and select the Needs icon.

2021-10-18 08_40_13-Window

1. Enter the Name of your need and add a Code to identify the need on the Dispatch window.
2. Additional details about the need can be added in Description field.
3. Select whether the need is an Equipment Need, Seating Need, Requires Training or has an additional Load Time.
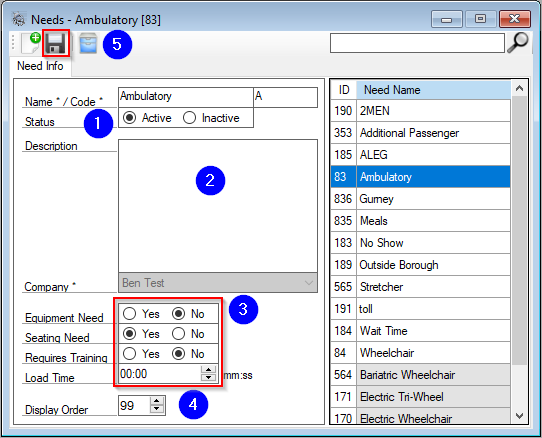
  • An Equipment Need indicates an item that needs to be brought with the client, such as an oxygen tank, or a wheelchair of a hospital discharge.
  • A Seating Need indicates the accommodations a passenger will require. Every Client record requires one seating need. This may also be referred to as the Level of Service by many transportation brokers.
  • A need that Requires Training will create a corresponding Qualification on the Driver profile. A trips with a need that requires training may only be serviced by drivers with the corresponding qualification.
  • RoutingBox calculates the distance between Pick Up and Drop Off locations for every trip and provides a time estimate. If we want that estimate to include the time it takes for the passenger to enter and exit the vehicle we will specify that value in the Load Time section in for any or all needs on the trip. Load times are most commonly added to Seating Needs such as Wheelchair or Stretcher but can be added to any need. Load Time is entered in minutes and seconds.
4. Setting the Display Order will change what order the needs will display on the Client and Trip Scheduling windows. Using 99 for the value of the display order will leave the needs in the order in which they were created by default. 
5. Click the Save button to save changes.

How to Create a Mode

Navigate to the Settings tab and select the Modes icon.

2021-10-18 09_29_01-Window
1. Enter the Name of the mode you would like to add. This describes the vehicle being used.
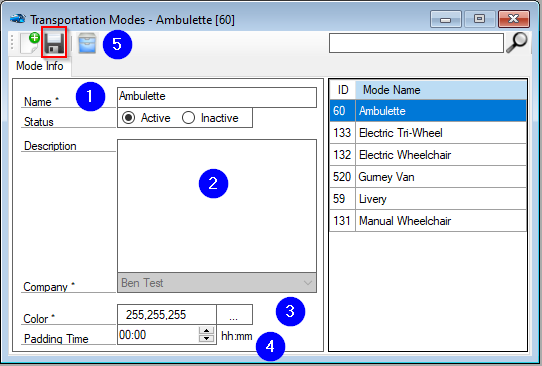
  • Livery describes taxi type vehicles for ambulatory passengers. 
  • Ambulette describes wheelchair vans. 
2. Additional details about the mode may be added in Description field.
3. Specify a Color this will be used to identify the mode in the Dispatching screen. If color coding is not required, choose white for this field.
4. Padding Time may be added to a mode of transportation. This represents additional time added to the calculation made for trips using this mode. This effectively gives drivers more time to complete trips. Padding Time may also be added to transportation modes that travel slower than normal traffic on average, such as many passenger vans that make multiple stops. Padding Time is added in hours and minutes.
5. Click the Save button to save changes.

How to Create a Purpose

Navigate to Settings, then Purposes.

2021-10-18 09_36_43-Window
1. Enter the Name for the purpose. This is synonymous with the reason for the trip.
2. Additional details about the purpose may be added in Description field.
3. Specify a Color this will be used to identify the purpose in the Dispatching screen. If color coding is not required, choose white for this field.
4. A priority for a trip purpose indicates to RoutingBox what trips should be considered a priority when using Automatic Dispatching. The lower the number, the higher the priority. 
5. A transporter may be alerted via a notification if a trip goes over the mileage calculated by indicating a Mileage Alert.
6. Click the Save button to save changes.

Troubleshooting

Every trips requires some combination of Need, Mode, and Purpose. Trips unable to pull rates are most likely impacted by trip set up. Contact RoutingBox Support for more information on how to troubleshoot trip setup.
If a transporter observes that pick up or drop off times are wildly different than what is expected it is likely a result of Load Time or Padding Time. A scheduled trips may need to have its estimated time updated if Load Time or Padding Time is updated.